
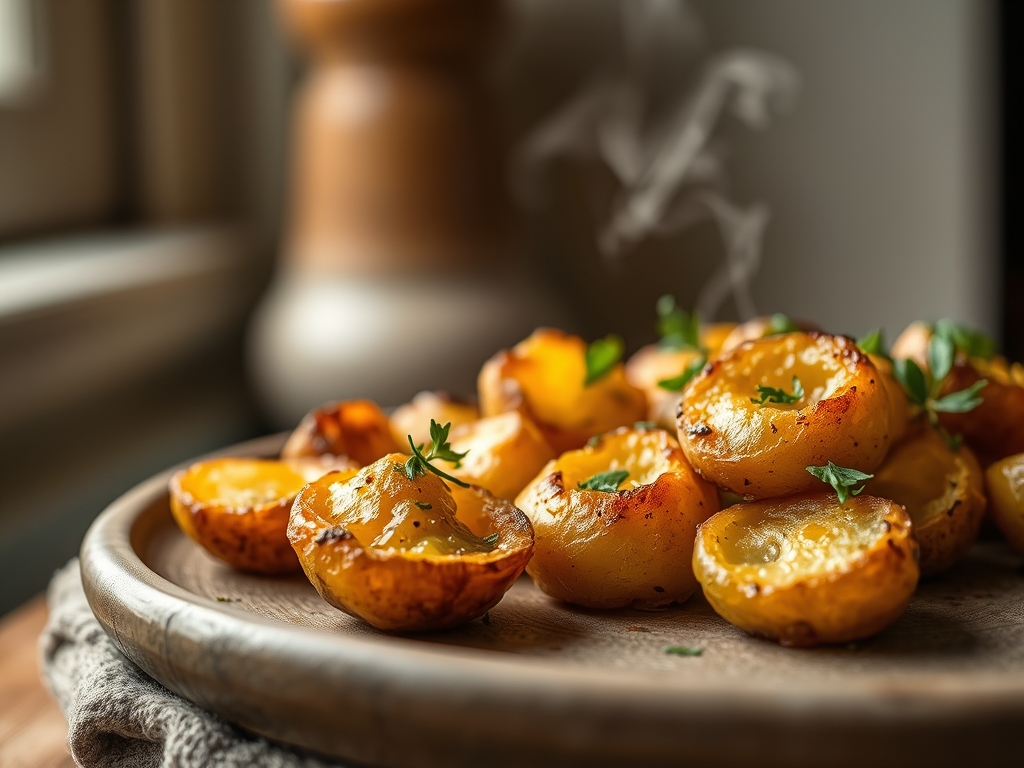
Close your eyes and listen for the sound of a fork hitting a surface so brittle it shatters like glass. That is the gold standard for roasted mini potato recipes; a contrast so violent between the craggy, salt-crusted exterior and the molten, buttery interior that it feels like a culinary magic trick. We are moving past the era of soggy, sad spuds and into the realm of high-impact starch engineering.
Imagine the kitchen filling with the scent of toasted garlic and rendered fat. It is a piquant, earthy aroma that signals the Maillard reaction is working overtime. Achieving this level of crunch is not about luck; it is about manipulating moisture and surface area. We are going to treat these tubers with the respect they deserve, using specific thermal techniques to transform humble starches into the most requested side dish in your repertoire.

The Gathers:
To begin, clear your workspace with a bench scraper and assemble your mise-en-place. You need two pounds of waxy mini potatoes; specifically, look for Dutch Yellow or C-size Red Bliss. These varieties have a high moisture content and a dense cellular structure that holds its shape during the parboiling phase. You will also need high-quality kosher salt, which has a jagged crystal structure that adheres better to the potato skin than fine table salt.
Your fat choice is the most critical variable. For the ultimate crunch, use duck fat or beef tallow. These animal fats have a higher smoke point and a complex flavor profile that vegetable oils simply cannot match. If you are keeping it plant-based, use a high-quality avocado oil infused with rosemary. Finally, grab a bulb of fresh garlic and a bunch of woody herbs like thyme or oregano.
Smart Substitutions:
If you cannot find mini potatoes, use Yukon Golds cut into uniform one-inch cubes to mimic the surface-to-volume ratio. If you lack duck fat, a mixture of clarified butter (ghee) and neutral oil provides a similar richness without burning. For an acidic pop, keep a bottle of champagne vinegar nearby to deglaze the pan at the very end.
The Clock
Efficiency in the kitchen is about "Chef's Flow," or the ability to overlap tasks so that no heat is wasted. Your total active time is roughly 15 minutes, with a total turnaround of 55 minutes.
Prep (10 Minutes): While your water comes to a boil in a large pot, scrub your potatoes and gather your digital scale to ensure even sizing.
The Parboil (10-12 Minutes): This is the non-negotiable step where the internal starches gelatinize.
The Roast (30-35 Minutes): This is the hands-off period where the convection of the oven dehydrates the exterior.
The Rest (3 Minutes): Vital for moisture redistribution.

1. The Alkaline Parboil
Drop your potatoes into boiling water spiked with half a teaspoon of baking soda. This raises the pH of the water, which breaks down the pectin in the potato skin more aggressively. You want the exterior to become "fuzzy" and starchy.
Pro Tip: This is known as enzymatic browning preparation. By breaking down the surface pectin, you create a starchy slurry on the outside of the potato that eventually dries into a thick, glass-like crust.
2. The Rough-Up
Once fork-tender, drain the potatoes and let them steam-dry for two minutes. Return them to the pot and shake them vigorously. You are looking to create a viscous layer of mashed potato paste on the surface of each whole potato.
Pro Tip: This increases the total surface area available for the Maillard reaction. More nooks and crannies mean more contact points for the hot fat to crisp up.
3. The Fat Infusion
In a small saucier, heat your duck fat with smashed garlic cloves and rosemary sprigs. Do not let the garlic burn; you just want to infuse the lipid with aromatics. Strain the fat over the potatoes and toss until every inch is coated in a shimmering layer of oil.
Pro Tip: Fats act as a heat transfer medium. By pre-infusing the fat, you ensure that the flavor molecules are bonded to the potato starch at a molecular level before they even hit the oven.
4. The High-Heat Blast
Preheat your heavy-duty baking sheet in a 425 degree Fahrenheit oven. Carefully spread the potatoes onto the hot metal. You should hear an immediate sizzle. Do not crowd the pan; if the potatoes are too close, they will steam instead of roast.
Pro Tip: This utilizes conductive heat. The immediate contact with the hot sheet pan jumpstarts the dehydration of the bottom surface, preventing the potatoes from sticking.
5. The Aeration Flip
Halfway through the roasting process, use tongs or a metal spatula to flip each potato. This ensures that the hot air in the oven can aerate all sides of the tuber, leading to a uniform 360-degree crunch.
Pro Tip: This step manages thermal carryover. By moving the potatoes, you prevent the bottom from overcooking while the top catches up, ensuring a fluffy interior.
6. The Finishing Touch
Once the potatoes are a deep mahogany brown, remove them from the oven. Use a microplane to zest a bit of lemon over the top and hit them with a final sprinkle of flaky sea salt. The residual heat will wake up the citrus oils without cooking them.
Pro Tip: This is the aromatic volatility phase. Adding fresh herbs or zest at the very end prevents the delicate oils from evaporating in the high heat of the oven.
The Deep Dive
When we look at the macro nutrition of roasted mini potato recipes, a standard serving provides roughly 200 calories, 4 grams of fiber, and a significant hit of potassium. To keep this Keto-friendly, you would need to swap the potatoes for cauliflower florets, though the roasting time will decrease by half. For a Vegan version, stick to avocado oil or refined coconut oil for that saturated fat mouthfeel.
The Fix-It: Common Pitfalls
- Soggy Potatoes: Usually caused by overcrowding the pan. Use two sheets if necessary to allow steam to escape.
- Burned Garlic: If you roast raw minced garlic for 30 minutes, it will turn bitter. Always infuse the oil first or add garlic in the last 5 minutes.
- Sticking to the Pan: You likely didn't wait for the crust to form. Potatoes "release" from the metal naturally once the starches have dehydrated.
Meal Prep & Reheating:
To maintain "day-one" quality, never use a microwave. The microwave agitates water molecules, making the crust rubbery. Instead, use an air fryer at 400 degrees for 4 minutes or a heavy-bottomed skillet on the stovetop to re-crisp the exterior.
The Wrap-Up
Mastering roasted mini potato recipes is the ultimate "cool girl" kitchen move. It shows you understand the chemistry of heat and the importance of texture. Whether you are serving these alongside a prime ribeye or eating them straight off the pan with a spicy aioli, these secrets ensure you never serve a boring side dish again. Now, go grab your bench scraper and get to work; those starches aren't going to crisp themselves!
The Kitchen Table
Why do my roasted potatoes turn out soft?
Soft potatoes usually result from overcrowding the baking sheet. When potatoes are too close together, they release steam that gets trapped, effectively boiling the potatoes instead of roasting them. Ensure at least an inch of space between each potato.
Should I soak potatoes before roasting?
Soaking is great for fries, but for roasting, parboiling in alkaline water is superior. It gelatinizes the surface starch, creating a slurry that crisps up into a much thicker, crunchier crust than soaking alone could ever achieve.
What is the best oil for roasting potatoes?
Duck fat or beef tallow provides the best crunch and flavor. For plant-based options, use avocado oil or ghee. These fats have high smoke points, meaning they won't break down or taste "burnt" at high roasting temperatures.
Can I roast potatoes at 450 degrees?
Yes, but you must monitor them closely. While 450 degrees creates an incredible crust, the window between "perfectly golden" and "charred" is very small. 425 degrees is generally the sweet spot for consistent, even browning without bitterness.